Tuesday, August 31, 2010

Lipcolour Hauls: Etude House Petite Darling Lips & Estee Lauder Pure Colour Gloss

From left to right: Etude House Petite Darling Lips in PK008, PP903, Estee Lauder Pure Colour Gloss in 59 Twilight Petal

For girls who love make up, we should all know that it is almost impossible to finish a stick of lipstick because we have simply too many of them! That is why I have recently grown to love the cosmetics range sold at Etude House. In particular, I love their Petite Darling Lips.


Each lipstick is only 2g. You can compare the size of it to my palm! I don't have particularly big hands =) I am more confident that i will be able to finish a lipstick of this mini size! Each lipstick retails at an affordable price of S$13.90.

Both of the colours are to the glossy side, but they are not exactly sheer. You can see the colours quite clearly on your lips.

From left to right: PK008, PP903

Petite Darling Lips in PP903. An easy-to-match brownish pink

Petite Darling Lips in PK009. A bright pink. A little eye make up and blusher will be enough to make you look great!


This is the Estee Lauder's Pure Colour Gloss in 59 Twilight Petal. The SA told me that it is a limited edition. You can still get this from Takashimaya, Tangs and Metro Paragon. It is a very glossy nude pink with quite a bit of gold and pink sparkles. It's the type of colour you can match with everything. It cost me S$36.

Estee Lauder Pure Colour Gloss in 59 Twilight Petal

From top to bottom: Petite Darling Lips PK008, PP903, Pure Colour Gloss in 59 Twilight Petal

Have I gotten you interested to buy anything? =D

Update on Ettusais Aqua Splash

So I have been using the new Ettusais Aqua Splash in place of my oil blotting paper for the past 5 days. I have normal to combination skin. On a typical day, after applying make up, shine will start to appear at my T-zone after about 2 hours in the morning. After blotting with normal blotting paper, shine will reappear (mostly at the nose area) after about an hour or so. My face is not the type that is really oily, but I am the type who prefer to have a "matte" look rather then a "dewy look"!

Amount of product left after 5 days

I normally use 5-6 pumps each time. I spray the product on bout 3-4 times a day

This is the result of the product on my face:

After applying make up, I spray the product on about half an hour later. My face stays matte for a maximum of about 3 hours. Without blotting, I spray the product on, pat, and face becomes more or less matte again, a little dewy, a bit of shine in a nice sort of way (not oily). However, after that, I will have to spray the product on about every hour or so if I want my face to stay matte.

I do not think that this is a miracle product, in the sense that it will not help your face stay matte for the whole day after application. However, it does do a good job in keeping your face matte for a short period of time without taking away moisture from your skin, like blotting papers. It will also be useful for those who are not diligent enough to touch up foundation regularly in the day as the splash contains power, which will somehow keep your skin looking smoother even without touching up (but of course you won't be able to achieve the flawless look without proper touch up).

I will give this product 3 stars out of 5. I might not repurchase as I initially thought that my face could stay matte longer after using it! I had rather high expectations of this product!

Saturday, August 28, 2010

My Top 10 Favourite Nail Colours of All Time

I love nail polish and my first purchase of cosmetics was a bottle of Maybelline nail polish in frosty pink (at the age of 14). I have a huge collection of nail polish and I have carefully selected 10 of my favourites from my enormous collection to post here.

A few trusted sites to purchase nail polish (Zoya, China Glaze, Nubar) are Trans Design, Nails de Royale and Head2Toe. But do observe any restrictions in your countries' postal services when purchasing nail varnish.

My favourites (from dark to light):

Chanel Le Vernis in 461 Blue Satin (S$35)
Dark blue shimmer. From afar, you might think this is a black cream. But as you look closely, this is actually a dark blue with very subtle black shimmer!

Orly nail lacquer in Happily Ever After (S$19 approx)
A dark berry red with blue undertone and shimmer! This is simply divine! Flatters my skin tone, makes my hands look fairer.

Anna Sui nail colour in 400 (S$24)
A true red. It looks slightly darker in real life. This is from Anna Sui's old nail colour collection. However, I think there are many other brands selling similar shade of red. Not to be confused with the new collection colour 400 (it's an orange red). This colour makes my hands look fairer too!

China Glaze nail lacquer in Ruby Pumps (US$6.50 approx)
A cherry red with red sparkles! It is not cream or frost or shimmer. It's a jelly sparkle! There is this glass-like quality to it when applied. Lovely! It is funky yet classy.

Zoya nail lacquer in Harlow (Matte) (US$7)
A very sophisticated purple-dark pink. This is a matte with shimmer. You have to see it to understand! I think this is a very unique colour.

Fancl nail colour in 25 (S$15.50)
A pretty mauve with subtle gold shimmer. I still remember seeing a girl wearing a similar shade on the MRT, loved it, and went around looking for a similar colour. Most shades looked either too purple or too pink! Finally, after a few weeks, I found this colour at the Fancl counter. It was one of the last places I looked, as I didn't even know Fancl sold nail polish then (probably 5-6 years ago).

OPI nail lacquer in I42 Elephantastic Pink (S$19-$23.50)
A unique hot pink. This is not just any normal hot pink. It is a super pretty pink with blue undertone! I did a manicure in this colour at the nail salon and I remember I could not stop staring at it.

Nubar nail lacquer in Chocolate Caramel (US$7.49)
I really don't know how to describe this! It looks exactly like the pic above. Exactly like caramel, with shimmer and a little bit of sparkle. I had to keep my fingers away from my teeth as I simply love caramel.

OPI nail lacquer in C89 Chocolate Moose (S$19-23.50)
A very easy-to-wear and match-everything-and-anything kind of cream brown.

Chanel Le Vernis in 257 Perle Rosee (S$35)
I think this was a limited edition. It is a light shimmery+frosty nude pink. There is a similar colour from Paul & Joe which is still available at the counters.

Hope you love some of the colours I love. Do leave some comments here if you want to share your favourite nail colours with me!

Friday, August 27, 2010

Review on My Beauty Diary Masks - Bird's Nest Mask & Q10 Rejuvenating Mask


I have been using this Taiwanese brand, My Beauty Diary's masks on a regular basis for a long time since last year. It is very reasonably priced between S$15.90-S$19.90, depending on which range you are buying. You can get them both at Guardian or Watsons. For overseas readers, you can get them from Bobodave Online Shop and Sasa.com. The brand has a wide range of different masks, at least like 16 types. They have interesting masks like Red Wine Mask, Black Pearl Mask, Sake Yeast Mask, Strawberry Yogurt Masks etc. You can read more about their whole range of masks from their official site. The Chinese site is more updated, but you can also read about their products in the English site, which seems like has not been updated since last year.

Here I review one of their older masks, the Q10 Rejuvenating Mask, and the latest addition to their range, the Bird's Nest Mask. I got the Q10 at Guardian (they don't seem to have the newer range yet), 10pcs for S$18.90, and the Bird's Nest at Watsons (they don't seem to have the old range), 10pcs for S$15.90. I have no idea why the newer mask is cheaper then the older mask! But they work just as well!

Q10 Rejuvenating Mask

The mask sheet for the Q10 Rejuvenating Mask is much thicker than the Bird's Nest Mask. The former contains anti-oxidant ingredients which help to keep your skin firm and youthful. It also contains hyaluronic acid, which stimulates the synthesis of collagen, maintains the moisture in your skin, making it more firm and resilient. I like this mask a lot! Each time after using it, my skin really brightens up and look much more radiant. I am not sure about the firming part, but my skin definitely is more moisturised and elastic.

Bird's Nest Mask

The mask sheet for the Bird's Nest Mask is thinner and fits on to my face really well. This mask contains kappaphycus extracts which helps to increase the hydration level of your skin. It also contains hydrolzed rice protein and hydrolzed soy protein which improve the skin's resilience, elasticity, translucency and soothes irritated skin. I would say the results of this mask is similar to the Q10. But after each use my face definitely becomes visibly more evenly toned and fairer, which I love!

What I like most about these masks is that there is no greasy feel after use at all. I specially love to use the mask before applying make up, if I have time during weekends. My foundation glides on smoothly, and skin seems flawless after that.

I highly recommend both masks!

Review on Heme 24hr Hydrating Detox White Night Jelly

S$18.90 (50ml) Spotted at Watsons

Heme is this Taiwanese brand that I think Watsons started selling only recently this year. The spokespersons for this brand is none other than the famous female pop girl group S.H.E. You can read more about this brand's products here.

I bought this home about 2 weeks ago, when I started becoming interested in trying out night jellies. I got interested because I have always been an avid fan of this Taiwanese show 女人我最大,and one of their 老师 (beauty experts), Nu-er actually introduced his own line of skincare products in the show and my sister bought some home online. So my sister told me over webcam that Nu-er's night jellies seem good, and I became really interested. As I remember seeing this Heme night jelly in Watsons, I decided to give this a try first before I consider buying some of Nu-er's online. For those who are interested, you can buy Nu-er's products here. He ships internationally.


This night jelly has a gel like texture. This is like an overnight mask. After your normal night skin care routine, you apply a reasonable amount of this over your night moisturiser and massage it all over your face. When the jelly is absorbed, you can just leave the jelly on then go to sleep. The next morning when you wake up, you skin should be brighter and more hydrated. You can follow your normal skin care regime the next day again (after washing your face of course ^^).

This is the amount I use for the whole face. I have been using this for a week and a half every night . It has a very nice but mild rosy scent. I actually put this into the fridge, so that when I apply it, it is really cooling and relaxing for the skin. As for results, this is what I have noticed so far: My skin seems to brighten up immediately after application. The red spots will look somewhat calmed. When I wake up the next morning, however, I do not see any visible difference to my skin, although my face does feel a little smoother. I guess that's because my skin is more hydrated perhaps?

I am not sure if I will purchase this product again, not because it doesn't work, but because there are so any other night jellies I want to try. The results are not significant enough for me to repurchase. However, at S$18.90 a jar which I believe will last pretty long, I think its worth a try, just to test how night jellies feel!

12 Simple Steps to Create an Easy Autumn Look

Hi~ I promised to do a tutorial with the new Maybelline Hyper Diamonds eye palette! Here is the look:


These are the products used:

From left to right: Maquillage Face Creator 3D in 55 Nude Tone Beige, Maybelline Hyper Diamonds in BR-1, Urban Decay Eyeshadow Primer Potion, Majolica Marjoca Curl, curl toward the sky mascara base, Esprique Precious Heart Graphical Mascara, MAC Powerpoint Eye Pencil in Duck, Clinique Long Last Glosswear SPF15 in 08 Guava Gold and 07 Bonfire

This is a close up of the palette used:
From top to bottom, left to right: Line colour- a medium brown sparkly shade, highlight- shimmery champagne, medium dark- shimmery copper, medium light- shimmery peachy pink/pinkish copper (so hard to describe!), top coat- glittery orange

12 Simple Steps:


1. Prime your eye using any eye shadow primer.


2. Using your finger, apply the highlight on your entire eyelid.


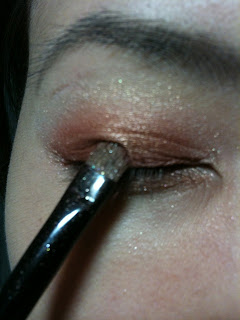
3. Blend the medium light shade on your upper medium lid.


4. Apply the medium dark colour on the lower medium lid. The colour should be blended slightly above your crease as seen from 2nd pic above. Line your lower lash line with the same colour.


5. Use the line colour to line your upper and lower lash line.


6. This step is optional. If you want your eyes to look more defined, use a brown liner (pencil or gel liner) to line your upper and lower lash line. I recommend using a liner with sparkles as the eye shadow is very sparkly. I don't have a brown liner with sparkles, so I just use a normal brown liner here. Do not use liquid liner as it will make your eye look a little harsh.


7. Apply the highlight colour to the inner corner of your eye.


8. Gently dub the glittering top coat on the centre of your eye (the part where light will reflect the most).


9. Apply a nude shade blusher to the apples of your cheeks. Use a sponge to dub away any fall outs.


10. Gently, curl your lashes. Apply mascara base and black mascara. Apply to lower lashes as well.


Some pics first...


11.Apply a light peachy gloss to your lips. Here I use Clinique's Long Last Glosswear SPF15 in 08 Guava Gold.


12. Apply a darker peachy colour to the centre of your lips (only) to create super juicy lips! Here I use Clinque's Long Last Glosswear SPF15 in 07 Bonfire.


FINISHED!


Hope you have enjoyed this look!